The Full Workflow
Edit your avatar's expression, fix the blink, then check the expression animations before uploading.
If you haven't installed the tool yet, see Installation.
① Edit the expression
Adjust the avatar's BlendShapes to create the expression you want.
Avatar Blink Fix repairs the blink to match this edited expression.
BlendShapes that reshape the whole face may prevent blinking from being fixed correctly.
If you use them, see Whole-face BlendShapes.
If the avatar already has an Avatar Blink Fix setup, follow "Redoing your expression edits later" below.
② Fix the blink
Right-click your avatar in the Hierarchy and choose [Avatar Blink Fix] → [自動修正(推奨)] (Auto Fix – Recommended).
An Avatar Blink Fix object is added inside the avatar, and you can preview the fixed expression.
Select the added object and check the fix settings in the Inspector.
If the button says [Stop preview], the preview is ON.
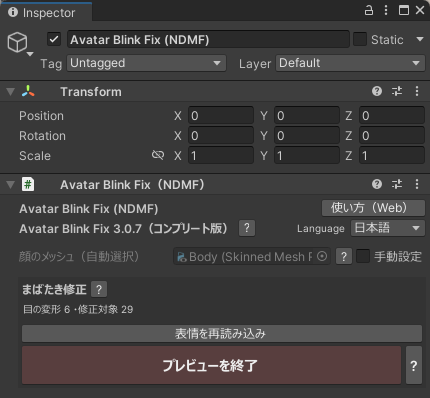
If [自動修正(推奨)] is grayed out, no matching preset was found.
Use Manual Fix and select the required items.
If you cannot find the right-click menu, you can also open the tool from Tools → Avatar Blink Fix at the top of Unity.
The right-click menu is shown in Japanese even when the tool's Language setting is English.
③ Check the expression animations
Check the expression animations before uploading.
The steps depend on whether you keep the avatar's original animations or edit them yourself.
Using the avatar's default expression animations
Auto Fix (Bake Mode) is recommended if you want to use the animations unchanged.
Select the added Avatar Blink Fix object and press [Switch to Bake mode] in the Inspector.
It may reduce breakage caused by conflicts with expression animations.
Note: Bake Mode is a Complete Edition feature.
Editing the expression animations
Use FaceEmo or a similar tool, or edit the animation files manually.
We recommend creating your expression animations from scratch.
If you reuse animations included with the avatar, remove entries that hold a corrected BlendShape at 0.
Leaving them in may cause a conflict with the corrected BlendShape.
Note: Remove only the affected BlendShape entries (curves), not the whole animation file.
If "conflict with expression animations" appears, check for these entries as well.
④ Upload and check in-game
Upload the avatar through the VRChat SDK as usual.
The fix is applied at upload time even if the preview is OFF.
Check the blink and expressions in VRChat. If everything looks right, you're done.
If the eyes look wrong in-game, there may be a conflict with an expression animation.
If you use [Auto Fix (Recommended)], check for remaining zero-value entries or try switching to Bake Mode.
Redoing your expression edits later
Turn the preview OFF before adjusting the face's BlendShapes again.
- Press [Stop preview] in the Avatar Blink Fix Inspector
- Edit the expression
- Press [Reload Expression]
You can also delete the Avatar Blink Fix object, edit the expression, then run Auto Fix again when you're done.
To restore the avatar to its state before the fix, delete the added Avatar Blink Fix object.
Quick reference
| Your setup | Method or instructions |
|---|---|
| Adjusting the shape of corrected blinks or winks | See Fine-tune or Replace BlendShapes (Complete Edition; 3.0.17 and later) |
| Using values above 100 or negative values | Use Bake Mode. [Auto Fix (Recommended)] cannot reproduce these values |
| Using Avatar Mouth Fix | Use Normal Fix in Mesh Swap |
| Not using NDMF, or keeping the 2.x-style workflow | Use Mesh Swap (Legacy) |
| Using face tracking | Bake Mode is recommended. See Using Face Tracking |
| Using a tool that adds BlendShapes | See Using Tools That Add BlendShapes |
If the fix does not work as expected, see the FAQ.